


Efficiency Realized: Storage Partitioned Joins
Spark + Iceberg = Minimized Data Shuffling

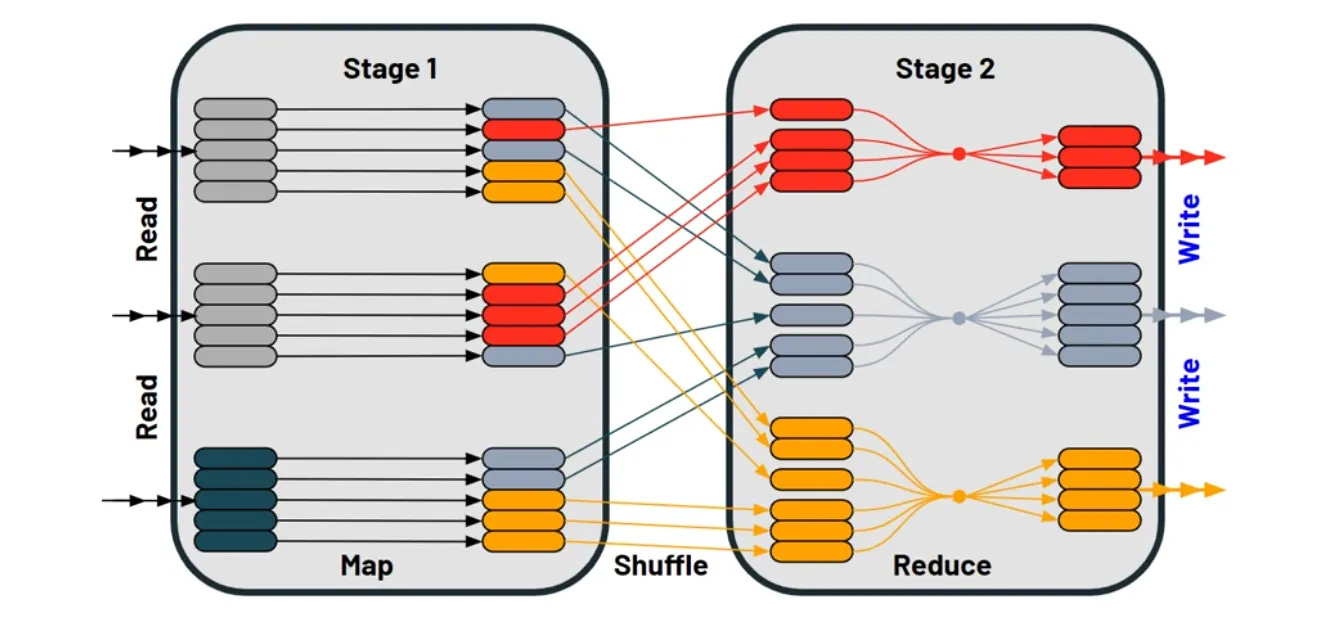
When datasets are too big to fit in memory, they become expensive to query or manipulate. Spark, the pre-eminent big data tool, has implemented a technique to parallelize work across many machines without incurring the great expense of transferring data between machines. This transfer between machines in a spark job is called a shuffle. Shuffles introduce opportunity for jobs to fail or need to retry stages. In practice, most spark clusters are elastic. They dynamically resize by adding and removing computers so as to not pay for machines that are idling without work to do. Clusters often also employ cheaper machines called Spot Instances that can be removed without warning. With a shuffle: if a machine is removed from a cluster and it was holding shuffle data, that data is lost and the stage before the shuffle has to be re-completed.
The technique is all in the name: Storage Partitioned Joins. If a dataset is sliced up by definition, we can use the information about each slice to distribute the work across machines so that they can operate independently without a shuffle.
Working Example
If you already have an environment where you can connect to a spark shell, skip down to Create and Populate Test Tables.
Test Spark Environment Setup
Let’s go through a simple example that shows a spark job that includes an SPJ. In order for spark to know information about the storage partitions, we need to employ what’s called an open table format. My preferred table format is Apache Iceberg. Borrowing from their quickstart guide, we’ll set up a locally running docker-backed spark cluster, iceberg table catalog, and Min.io object file storage.
Save the yaml below into a file named docker-compose.yaml:
version: "3"

services:
  spark-iceberg:
    image: tabulario/spark-iceberg
    container_name: spark-iceberg
    build: spark/
    networks:
      iceberg_net:
    depends_on:
      - rest
      - minio
    volumes:
      - ./warehouse:/home/iceberg/warehouse
      - ./notebooks:/home/iceberg/notebooks/notebooks
    environment:
      - AWS_ACCESS_KEY_ID=admin
      - AWS_SECRET_ACCESS_KEY=password
      - AWS_REGION=us-east-1
    ports:
      - 8888:8888
      - 8080:8080
      - 10000:10000
      - 10001:10001
      - 18080:18080
  rest:
    image: tabulario/iceberg-rest
    container_name: iceberg-rest
    networks:
      iceberg_net:
    ports:
      - 8181:8181
    environment:
      - AWS_ACCESS_KEY_ID=admin
      - AWS_SECRET_ACCESS_KEY=password
      - AWS_REGION=us-east-1
      - CATALOG_WAREHOUSE=s3://warehouse/
      - CATALOG_IO__IMPL=org.apache.iceberg.aws.s3.S3FileIO
      - CATALOG_S3_ENDPOINT=http://minio:9000
  minio:
    image: minio/minio
    container_name: minio
    environment:
      - MINIO_ROOT_USER=admin
      - MINIO_ROOT_PASSWORD=password
      - MINIO_DOMAIN=minio
    networks:
      iceberg_net:
        aliases:
          - warehouse.minio
    ports:
      - 9001:9001
      - 9000:9000
    command: ["server", "/data", "--console-address", ":9001"]
  mc:
    depends_on:
      - minio
    image: minio/mc
    container_name: mc
    networks:
      iceberg_net:
    environment:
      - AWS_ACCESS_KEY_ID=admin
      - AWS_SECRET_ACCESS_KEY=password
      - AWS_REGION=us-east-1
    entrypoint: >
      /bin/sh -c "
      until (/usr/bin/mc config host add minio http://minio:9000 admin password) do echo '...waiting...' && sleep 1; done;
      /usr/bin/mc rm -r --force minio/warehouse;
      /usr/bin/mc mb minio/warehouse;
      /usr/bin/mc policy set public minio/warehouse;
      tail -f /dev/null
      "
networks:
  iceberg_net:
Then run the command: docker-compose up in the directory where you saved that file.*1
Create and Populate Test Tables
For ease of use, let’s use the spark-sql cli to start up a shell. There are some specific settings we need to set to enable SPJ:
docker exec -it spark-iceberg spark-sql --conf spark.sql.autoBroadcastJoinThreshold=-1 --conf spark.sql.adaptive.enabled=false --conf spark.sql.sources.bucketing.enabled=true --conf spark.sql.sources.v2.bucketing.enabled=true --conf spark.sql.iceberg.planning.preserve-data-grouping=true --conf spark.sql.sources.v2.bucketing.pushPartValues.enabled=true --conf spark.sql.requireAllClusterKeysForCoPartition=false --conf spark.sql.sources.v2.bucketing.partiallyClusteredDistribution.enabled=true --name partition_testNext let’s create some test tables. For this scenario we have customers and orders, both tables are partitioned by customer_id into 256 buckets.
-- CREATE DB
CREATE DATABASE IF NOT EXISTS partition_test;
USE partition_test;

-- Create the customers table partitioned by customer_id
CREATE TABLE IF NOT EXISTS partition_test.customers (
    customer_id INT,
    first_name VARCHAR(50),
    last_name VARCHAR(50),
    email VARCHAR(100),
    date_of_birth DATE)
    USING ICEBERG
    PARTITIONED BY (bucket(256, customer_id));

-- Create the orders table partitioned by customer_id
CREATE TABLE IF NOT EXISTS partition_test.orders (
    order_id INT,
    customer_id INT,
    order_date DATE,
    amount DECIMAL(10, 2),
    status VARCHAR(20))
    USING ICEBERG
    PARTITIONED BY (bucket(256, customer_id));

--- First populate a million customers
INSERT INTO partition_test.customers
SELECT
    i AS customer_id,
    CONCAT('First', i % 1000) AS first_name,
    CONCAT('Last', i % 1000) AS last_name,
    CONCAT('customer', i, '@example.com') AS email,
    DATE_ADD('1900-01-01', i % 36525) AS date_of_birth
FROM (
    SELECT EXPLODE(SEQUENCE(1, 1000000)) AS i
) s;


-- Next populate 10 million orders of various statuses
WITH customer_seq AS (
    SELECT EXPLODE(SEQUENCE(1, 1000000)) AS i
),
order_seq AS (
    SELECT EXPLODE(SEQUENCE(0, 9)) AS j
)
INSERT INTO partition_test.orders
SELECT
    (c.i * 10 + o.j) AS order_id,
    c.i AS customer_id,
    DATE_ADD('2020-01-01', (c.i * 10 + o.j) % 365) AS order_date,
    ROUND(RAND() * 1000, 2) AS amount,
    CASE WHEN (o.j % 5) = 0 THEN 'Completed'
         WHEN (o.j % 5) = 1 THEN 'Pending'
         WHEN (o.j % 5) = 2 THEN 'Shipped'
         WHEN (o.j % 5) = 3 THEN 'Cancelled'
         ELSE 'Returned'
    END AS status
FROM
    customer_seq AS c
CROSS JOIN
    order_seq AS o;
See it in Action
Finally Perform a query that joins the tables:
CREATE OR REPLACE TABLE partition_test.customer_spend_by_status
USING ICEBERG
PARTITIONED BY (bucket(256, customer_id))
AS SELECT
    c.customer_id,
    c.first_name,
    c.last_name,
    o.status,
    SUM(o.amount) AS total_amount
FROM
    partition_test.customers c
JOIN
    partition_test.orders o
ON
    c.customer_id = o.customer_id
GROUP BY
    c.customer_id, c.first_name, c.last_name, o.status;

While your spark shell is open, you can see job information on the spark history server’s incomplete applications tab.
“But Sam, I still see a shuffle there at the end of the query execution! What’s with that?”
Good Eye! Well, the join didn’t require a shuffle, but writing to the resulting table did.
Fortunately there is something to be done. If the partitioning strategy of the resulting table matches the ones we queried, we can write without a shuffle by setting an additional write property:
set `spark.sql.iceberg.distribution-mode`= none;Re-running the aggregation with that additional property, we’ve eliminated the shuffle and the resulting DAG looks like this:

Conclusion
Of course, some operations inherently require transferring data between machines because of the aggregation clause of the query. But if you can avoid it, shuffle-less jobs will prove to be more reliable and use less cluster resources.
A preference for aggregations over group by is a healthy muscle to build. Sometimes writing a custom aggregator (also known as a User-Defined Aggregate Function) can be beneficial. A common use case I come across is counting and deduplicating at the same time. From experience, writing UDAFs in Java/Scala is far cleaner than describing them in SQL, though the outcome is the same.
Finally, I recommend setting these SPJ required properties at the job level, as it turns off Adaptive Query Execution. AQE can be beneficial for other queries that might encounter data skew. In other words: Use SPJ where it’s going to help, and don’t shoot yourself in the foot everywhere else.
Appendix
Here are the settings required to perform an SPJ for copying to wherever you set your spark properties:
# Spark SQL
set spark.sql.autoBroadcastJoinThreshold = -1; # This is not strictly necessary, just important for testing so that a broadcast doesn't happen instead.
set spark.sql.adaptive.enabled = false;
set spark.sql.sources.bucketing.enabled = true;
set spark.sql.sources.v2.bucketing.enabled=true;
set `spark.sql.iceberg.planning.preserve-data-grouping` = true;
set spark.sql.sources.v2.bucketing.pushPartValues.enabled=true;
set spark.sql.requireAllClusterKeysForCoPartition=false;
set spark.sql.sources.v2.bucketing.partiallyClusteredDistribution.enabled=true;
set `spark.sql.iceberg.distribution-mode`=none; # Only necessary to avoid shuffle before writing


# Spark Conf Setting
conf.set("spark.sql.autoBroadcastJoinThreshold","-1")
conf.set("spark.sql.adaptive.enabled","false")
conf.set("spark.sql.sources.bucketing.enabled","true")
conf.set("spark.sql.sources.v2.bucketing.enabled","true")
conf.set("spark.sql.iceberg.planning.preserve-data-grouping","true")
conf.set("spark.sql.sources.v2.bucketing.pushPartValues.enabled","true")
conf.set("spark.sql.requireAllClusterKeysForCoPartition","false")
conf.set("spark.sql.sources.v2.bucketing.partiallyClusteredDistribution.enabled","true")
conf.set("spark.sql.iceberg.distribution-mode","none")

# Spark Shell Example
spark-shell --packages org.apache.iceberg:iceberg-spark-runtime-3.5_2.12:1.5.2 \
--conf spark.sql.extensions=org.apache.iceberg.spark.extensions.IcebergSparkSessionExtensions \
--conf spark.sql.catalog.local=org.apache.iceberg.spark.SparkCatalog \
--conf spark.sql.catalog.local.type=hadoop \
--conf spark.sql.catalog.local.hdfs_catalog.io-impl=org.apache.iceberg.gcp.gcs.GCSFileIO \
--conf spark.sql.catalog.local.warehouse=gs://path-to-your/warehouse \
--conf spark.sql.defaultCatalog=local \
--conf spark.sql.autoBroadcastJoinThreshold=-1 \
--conf spark.sql.adaptive.enabled=false \
--conf spark.sql.sources.bucketing.enabled=true \
--conf spark.sql.sources.v2.bucketing.enabled=true \
--conf spark.sql.iceberg.planning.preserve-data-grouping=true \
--conf spark.sql.sources.v2.bucketing.pushPartValues.enabled=true \
--conf spark.sql.requireAllClusterKeysForCoPartition=false \
--conf spark.sql.sources.v2.bucketing.partiallyClusteredDistribution.enabled=true \
—conf spark.sql.iceberg.distribution-mode=noneThe first time you run this command it may take a while, as the spark docker image is quite large and has to be downloaded. The second time you use this command it will be instantaneous.